Cheat Engine Tutorial Solution

Table of Contents
Step 1 - Setup⌗
This is a simple setup; we can skip it as it is pretty straightforward!
Step 2 - Modify Value⌗
To complete this step, press “Hit me” once, then enter the new health value in the text input field on the top right of the screen (make sure that the value type is 4 Bytes) and hit First Scan. This should list a number of addresses where this value was found. Now press “Hit me” once more and double click on the entry that displays red values. This means that the current value has changed since the scan. You can also modify the value in the input field to fit the new health value and click “Next Scan”. This will only show the addresses that contain the new value from the previous list.
Once the address is double clicked, it should appear on the lower window. From there, you can double click on the value and modify it to whatever you want (1000 in this case). That’s it, you just completed the first actual step!
Step 3 - Unknown Value⌗
For this step, start with a New Scan searching for a “Value between” 0 and 500. Then click “Hit me” and execute a second scan searching for and entry that “Decreased value by” the number that showed up on the window. In my case it was -8, so I enter 8 (decreased by 8 and not decreased by -8). You can repeat this process until you find a single entry. Using the same technique as before, change the value at this address to 5000 and head for the next challenge!
Step 4 - Float and Double⌗
This step teaches about playing with float and double data type. First, click “Hit me” and “Fire” at least once. Then simply search for the new values while making sure that the Value Type is set to float for the Health and double for the Ammo. Once you found the addresses, change the value to 5000 or higher and proceed!
Step 5 - Clear Code⌗
This step is pretty straight forward with the description. First, find the value’s address, then add it to the list of addresses by double clicking it and then hit F6 (or right click > Find out what writes to this address). Hit “Change value”, right-click on the instruction that appeared and select “Replace with code that does nothing (NOP)”. As the name says, the instruction that is supposed to modify the value changed to one that is inoffensive. Clicking “Change value” now should not modify the value on the window and grant access to the next step.
Step 6 - Pointers⌗
This step dives into the pointers. To solve it, first find the address of the value, as before. Once you have it, find the instruction that modifies it, just as we did the step before. The difference now is that we won’t modify the instruction, but we will extract the pointer.
The instruction that you should have found is mov [rdx], eax. This means that the content of rdx is the address of our value. Click on the instruction, grab rdx’s value from the listing and search for it. We search for this value because there is a pointer, somewhere in memory, that holds this value. When we find where this value is located, we get the location of the pointer. To make sure that we have the actual pointer’s address (and not the pointer’s address plus an offset), we must check what writes/accesses this memory. In our case, there was no offset so the address that we extracted is the same as the address that we first found, but it’s a good practice to make sure.
Once you got the pointer, click “Add Address Manually”, check “Pointer” and type in the address of the pointer (“Tutorial-x86_64.exe”+325AD0 in our case). We don’t need an offset, but if we did, we would have added it in the text input field above the pointer. After hitting “Ok”, we have or static pointer (the address should be P->xxxxxxxx, otherwise something was done wrong), which means that even if we hit change pointer, will keep access to the value.
To complete the step, modify the value to 5000 and check the “Active” box to freeze it.
Step 7 - Code Injection⌗
This step shows how to perform code injection, which is pretty interesting. First, find the instruction that modifies the value using the same techniques that we used before. Once you got it, hit “Show disassembler”. This will give you a beautiful view of the disassembly as well as a hex dump. We see that the instruction decreased our health, but we want it to increase so let’s modify it.
Open the “Auto Assemble” tool using either Ctrl+A or “Tools” > “Auto Assemble”. Now search for “Template” > “Code Injection” or Ctrl+I to fill the window with a code injection template. The proposed address on the pop up window should be the one you selected, but you can adjust it if it’s not the case. What this new assembly does is that it allocates a new memory for our personal code, jumps to it, executes you code, then executes the instruction that you “overwrote” and jump back to where it left off. Since we want to add points to our health, we can simply remove the initial instruction. Fill the window with the following code to increase health by 2 for every hit:
alloc(newmem,2048,"Tutorial-x86_64.exe"+2DB57)
label(returnhere)
label(exit)

newmem:
add dword ptr [rsi+000007E0], 2

exit:
jmp returnhere

"Tutorial-x86_64.exe"+2DB57:
jmp newmem
nop 2
returnhere:
Step 8 - Level-4 Pointer⌗
This step wants us to find a level-4 pointer. First, let’s find the address of the current value using the same method we used before. In my case, I get 0x01546198. Now let’s find the first level pointer. As in step 6, we must find out what writes to this address, change the value, select the instruction that pops out and extract the pointer, from rsi this time. I get rsi = 01546180.
It is important to note that the pointer’s value is contained in
rsiand notrsi + 18if the instruction ismov [rsi + 18], eax, for example. This is because the pointer that is held inrsiprobably points to a structure or a class. In that case, the element accessed is located at offset 18 in the object, so we must add it torsi’s value since it points to the beginning of the object.
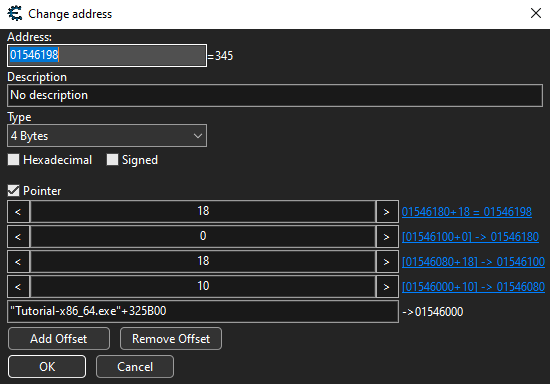
Now let’s find which memory location refers to this address. Without closing the instruction’s window (make sure that you’ll remember the order of appearance of the windows), make a new scan with this value and find another (dynamic) address. In my case, I get 0x01546100. If we find out what accesses this address and change the value, we get two instructions. We will prefer the first one (cmp qword ptr [rsi], 00) because it didn’t modify rsi’s value. We now extract the new address and repeat the process until we get the static address (the one in green). Since we didn’t close the windows in the process, we can now add the pointer to the list along with the four offsets. This is what you should get:
Figure 1. Solution to step 8

To complete this section, change the value of the pointer to 5000, check the box to prevent the value from changing, and hit change pointer. You should have access to the next button after 3 seconds.
Step 9 - Final Game⌗
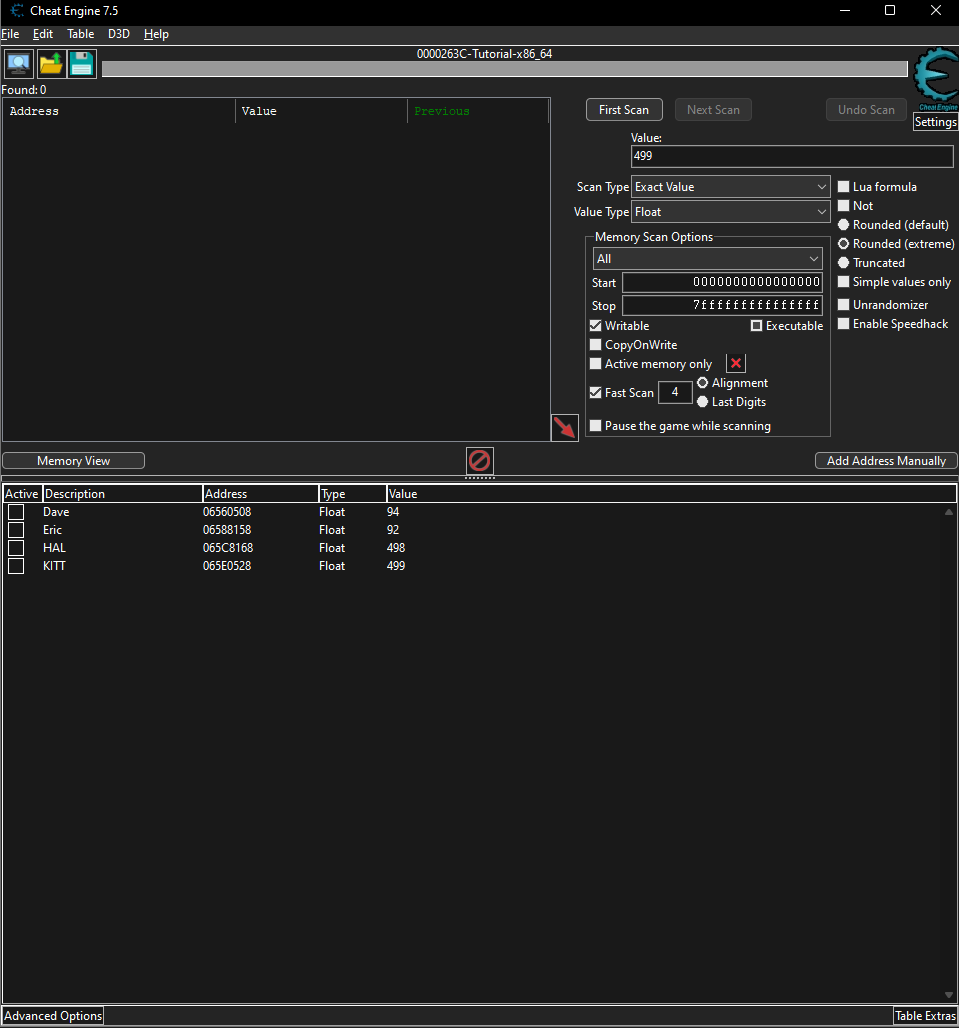
This one sums up most if not all of the techniques that were taught in the previous challenges. To solve it, I started by listing every player’s health address, as shown on figure 2 and then find the pointer for Dave to see how it’s built. Using the same techniques as before (find what writes to the address and extract the pointer), I found that Dave was located at 0x06560500. When you browse the corresponding memory section, you find that the string “Dave” hangs there, which is great for us if we want to prevent him and Eric from being hit!
Figure 2. Players health

Now we can find the address where the health is subtracted and inject code to prevent it from happening to our team members. The address is easily found using find out what accesses this address on any player. The instruction that we get is movss [rbx+08], xmm0, so we can execute it only for non-team members using code injection (Reminder: the code injection window can be reached using Ctrl+A followed by Ctrl+I). Here is the code to inject:
alloc(newmem,2048,"Tutorial-x86_64.exe"+2F25D)
label(returnhere)
label(exit)

newmem:
cmp [rbx+19], 65766144
je returnhere
cmp [rbx+19], 63697245
je returnhere
movss [rbx+08],xmm0

exit:
jmp returnhere

"Tutorial-x86_64.exe"+2F25D:
jmp newmem
returnhere:
Once injected you can hit “Restart game and autoplay” and see the enemies’ health decrease until you win. The first hex (0x65766144) corresponds to the string “Dave” in little-endian whereas the second is the same but for “Eric”. What this assembly code does is simply to check if the value at offset 19 corresponds to “Dave” or “Eric” and if not, apply the health decrease.
Overall, this was a very entertaining and educative tutorial. I am looking forward to using these new techniques during a CTF or anywhere else!